3.1.4. Input Controls — Mastering User Inputs in R Shiny
1. Introduction
R Shiny input controls are the foundation of reactive web applications built with R. They transform static R scripts into interactive, browser-accessible applications that respond instantly to user actions. Understanding and mastering input controls is essential for modern data science applications where interactivity, responsiveness, and user experience are paramount.
- Why input controls matter
- They capture user intent.
- They drive reactive computations.
- They define the UX boundary between user and server.
- Evolution in brief
- Static R scripts -> Batch processing -> Shiny reactive UI -> Modular, componentized apps -> Integrations with JS frameworks.
2. Overview: The reactive paradigm
At a high level:
- Inputs produce reactive values (input$...).
- Outputs are rendered based on dependencies on inputs.
- Reactions are automatic: when an input changes, dependent expressions re-evaluate.
Key patterns:
- req(), validate(), need() for guards.
- isolate(), observeEvent(), eventReactive() for controlled reactivity.
- Modularization for reuse and cleaner dependency management.
3. Comprehensive Input Control Categories
In this chapter we explore R Shiny's principal input controls and advanced variants, give concrete examples, present error-handling patterns, and show UI/UX tips.
3.1. Text Input Controls — Deep Dive
3.1.1 textInput
Purpose:
- Collect single-line text strings (usernames, search queries, tags).
Core parameters:
- inputId, label, value (initial), placeholder
Best practices & patterns:
- Use placeholder to show hint text.
- Validate with regex patterns using validate/need on server.
- Trim and sanitize input before use (trimws, gsub).
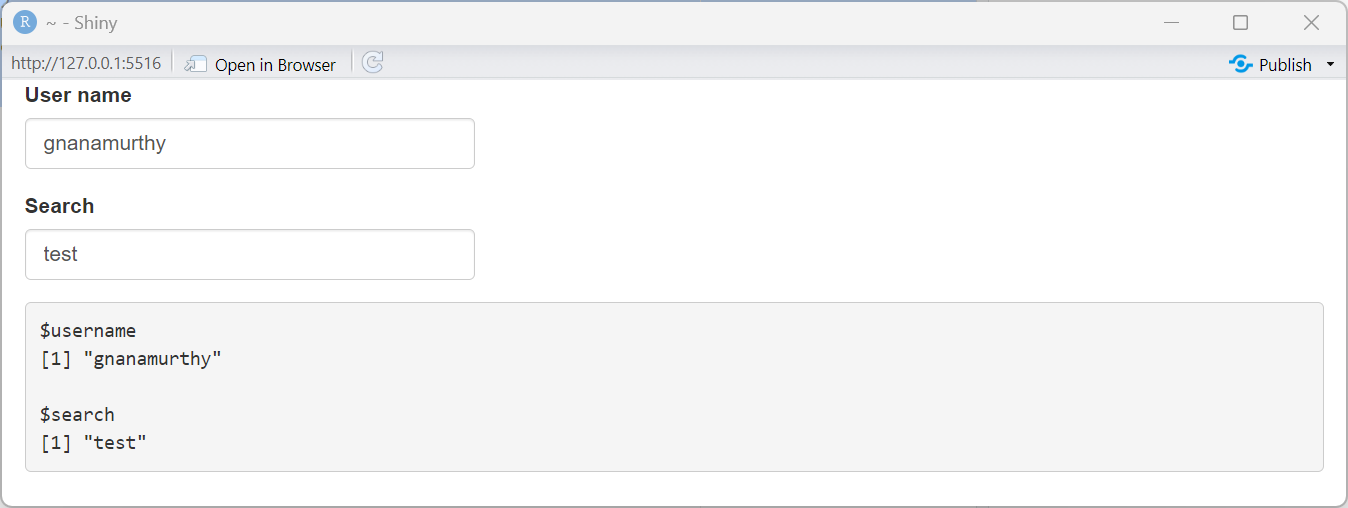
Example: username + search
library(shiny)
ui <- fluidPage(
  textInput("username", "User name", placeholder = "first.last or email"),
  textInput("search", "Search", placeholder = "Type keywords and press Enter"),
  verbatimTextOutput("summary")
)
server <- function(input, output, session) {
  output$summary <- renderPrint({
    req(input$username)
    user <- trimws(input$username)
    list(username = user, search = input$search)
  })
}
shinyApp(ui, server)
Validation patterns
- Use grepl() or stringr::str_detect() to validate formats.
- Provide immediate feedback using validate(need(...)) and showNotification() for friendly UX.
3.1.2 passwordInput
Purpose:
- Accept sensitive text without echoing content to screen.
Best practices:
- Never store plain text passwords.
- Use shiny::passwordInput for masking; for authentication use secure backends (bcrypt, OAuth).
- Keep sessions stateless for critical security contexts.
Example: secure guard (demonstration only)
library(shiny)
ui <- fluidPage(
  passwordInput("pw", "Enter password"),
  actionButton("login","Login"),
  verbatimTextOutput("auth")
)
server <- function(input, output, session) {
  observeEvent(input$login, {
    if (identical(input$pw, "demo")) {
      showNotification("Login successful", type = "message")
    } else {
      showNotification("Invalid password", type = "error")
    }
  })
  output$auth <- renderPrint({ input$pw })
}
shinyApp(ui, server)

3.1.3 textAreaInput
Use-cases:
- Multi-line text like comments, long descriptions, SQL, or copy-paste JSON.
Tips:
- Enable resizable = TRUE for user comfort.
- Use columns or CSS to limit visual width.
- For large text, preprocess line endings and size before storing.
library(shiny)
ui <- fluidPage(
textAreaInput("comments", "Comments", placeholder = "Enter your feedback here...",
rows = 5, resize = "vertical"),
div(style = "margin-bottom:8px;", textOutput("char_count")),
actionButton("submit", "Submit"),
verbatimTextOutput("submitted")
)
server <- function(input, output, session) {
output$char_count <- renderText({
# show live character count (handles NULL safely)
n <- if (is.null(input$comments)) 0 else nchar(input$comments)
paste0("Characters: ", n)
})
observeEvent(input$submit, {
req(input$comments)
# basic trimming and sanitization for display (demo purposes)
msg <- trimws(input$comments)
msg <- gsub("\\s+", " ", msg) # collapse repeated whitespace
msg <- gsub("<", "<", msg) # escape angle brackets
msg <- gsub(">", ">", msg)
showNotification("Comment submitted", type = "message")
output$submitted <- renderPrint({ msg })
})
}
shinyApp(ui, server)
3.2. Numeric Input Mastery
3.2.1 numericInput
Used for precise numeric inputs. Key params:
- value, min, max, step, width.
Best practices:
- Use min/max to prevent invalid ranges.
- Use step to suggest precision (e.g., step = 0.01 for financial data).
- Format display with formattable or scales if showing elsewhere.
Example:
library(shiny)

ui <- fluidPage(
  numericInput("price", "Unit price ($)", value = 9.99, min = 0, step = 0.01),
  numericInput("qty", "Quantity", value = 1, min = 1, step = 1),
  verbatimTextOutput("cost")
)
server <- function(input, output) {
  output$cost <- renderPrint({
    req(input$price, input$qty)
    total <- input$price * input$qty
    paste0("Total: $", formatC(total, format="f", digits=2))
  })
}
shinyApp(ui, server)
Edge-cases:
- Scientific notation: validate and format as needed.
- Large ranges: use sliders or validated text inputs instead.
3.2.2 sliderInput
Versatile: single value or range (with two handles). Params:
- min, max, value (single or vector), step, animate, ticks.
Design tips:
- Use animation for time-series exploration.
- Choose step carefully to avoid floating-point accumulation problems.
- For large discrete lists, prefer selectize instead of slider.
Example: dual-handle range
library(shiny)

ui <- fluidPage(
  sliderInput("range", "Select range", min = 0, max = 100, value = c(20,80)),
  plotOutput("hist")
)
server <- function(input, output) {
  output$hist <- renderPlot({
    v <- rnorm(1000, mean=50, sd=20)
    rng <- input$range
    hist(v[v>=rng[1] & v<=rng[2]], main="Filtered histogram")
  })
}
shinyApp(ui, server)
3.3. Selection Interface Design
3.3.1 selectInput
Powerful dropdown. Parameters:
- choices (named lists), selected, multiple, selectize (T/F).
Performance:
- For large datasets, set selectize = TRUE and server = TRUE (if using selectizeInput with server-side processing).
- Use updateSelectInput to dynamically change options.
Example: server-side selectize
library(shiny)

ui <- fluidPage(
  selectizeInput("country", "Country", choices = NULL, options = list(placeholder="Type to search")),
  tableOutput("info")
)
server <- function(input, output, session) {
  # populate choices dynamically
  updateSelectInput(session, "country", choices = c("India", "USA", "Canada", "UK"))
  output$info <- renderTable({
    req(input$country)
    data.frame(Country = input$country)
  })
}
shinyApp(ui, server)
3.3.2 radioButtons
Use for mutually exclusive choices. Inline layout improves space usage:
- Use choiceNames/choiceValues for custom HTML labels.
# Example: radioButtons with custom HTML labels and inline layout
library(shiny)

ui <- fluidPage(
  radioButtons(
    inputId = "color",
    label = "Choose a color:",
    choiceNames = list(
      tags$span(style = "color:#e74c3c;", "Red"),
      tags$span(style = "color:#27ae60;", "Green"),
      tags$span(style = "color:#3498db;", "Blue")
    ),
    choiceValues = c("red", "green", "blue"),
    inline = TRUE
  ),
  verbatimTextOutput("sel_color")
)

server <- function(input, output, session) {
  output$sel_color <- renderPrint({
    req(input$color)
    paste("You selected:", input$color)
  })
}

shinyApp(ui, server)
3.3.3 checkboxInput / checkboxGroupInput
- checkboxInput for boolean toggles, e.g., feature on/off.
- checkboxGroupInput for multi-select scenarios; watch for empty selections.
Dynamic option generation
- Use observe or reactive to rebuild groups based on data filtering.
# Example: checkboxInput (boolean) + checkboxGroupInput (multi-select) with validation
library(shiny)

ui <- fluidPage(
  checkboxInput("agree", "I agree to the terms", value = FALSE),
  checkboxGroupInput(
    "features",
    "Select features to enable:",
    choices = c("Notifications" = "notif", "Auto-save" = "autosave", "Dark mode" = "dark")
  ),
  actionButton("apply", "Apply"),
  verbatimTextOutput("status")
)

server <- function(input, output, session) {
  observeEvent(input$apply, {
    # require agreement before applying features
    validate(need(input$agree, "You must agree to the terms to apply features."))
    sel <- input$features
    if (is.null(sel) || length(sel) == 0) {
      showNotification("No features selected", type = "warning")
      output$status <- renderPrint("Applied: none")
    } else {
      output$status <- renderPrint({
        paste0("Applied (", length(sel), "): ", paste(sel, collapse = ", "))
      })
      showNotification("Features applied", type = "message")
    }
  })
}

shinyApp(ui, server)
3.4. Advanced Date and Time Management
3.4.1 dateInput
- Calendar widget; supports min and max dates.
- Locale: set lang in shiny or use lubridate for parsing locale-specific formats.
- Use min/max/business day restrictions with custom validation.
# Example: dateInput with min/max, format and a simple validation button
library(shiny)

ui <- fluidPage(
  dateInput(
    inputId = "event_date",
    label = "Event date",
    value = Sys.Date() + 7,               # default one week from today
    min = Sys.Date() - 365*5,            # 5 years back
    max = Sys.Date() + 365,              # 1 year ahead
    format = "dd-mm-yyyy"
  ),
  actionButton("validate_date", "Validate date"),
  verbatimTextOutput("date_info")
)

server <- function(input, output, session) {
  output$date_info <- renderPrint({
    req(input$event_date)
    paste("Selected:", format(as.Date(input$event_date), "%Y-%m-%d"))
  })

  observeEvent(input$validate_date, {
    sel <- as.Date(input$event_date)
    if (sel < Sys.Date()) {
      showNotification("Warning: selected date is in the past.", type = "warning")
    } else {
      showNotification("Selected date is valid.", type = "message")
    }
  })
}

shinyApp(ui, server)
3.4.2 dateRangeInput
- Good for analytics windows; validate that start <= end.
- Use server-side constraints for booking systems (e.g., minimum stay logic).
Sample date validation
ui <- fluidPage(
  dateInput("start", "Start date"),
  dateInput("end", "End date"),
  verbatimTextOutput("period")
)
server <- function(input, output) {
  output$period <- renderPrint({
    req(input$start)
    end <- if (is.null(input$end)) Sys.Date() else input$end
    if (as.Date(input$start) > as.Date(end)) {
      validate("Start date must be before end date")
    }
    as.list(c(start = input$start, end = end))
  })
}
shinyApp(ui, server)
3.4.3 timeInput
- Not native to base Shiny; available through shinyTime or custom JS.
- Use for scheduling and duration calculations.
# Example 1: time input using shinyTime (install.packages("shinyTime"))
library(shiny)
# install.packages("shinyTime") # uncomment to install
library(shinyTime)

ui <- fluidPage(
  timeInput("appt_time", "Appointment time", value = strptime("14:30", "%H:%M")),
  actionButton("confirm", "Confirm"),
  verbatimTextOutput("time_info")
)

server <- function(input, output, session) {
  output$time_info <- renderPrint({
    req(input$appt_time)
    paste("Selected time (raw):", format(input$appt_time, "%H:%M"))
  })

  observeEvent(input$confirm, {
    showNotification(paste("Appointment set at", format(input$appt_time, "%H:%M")), type = "message")
  })
}

shinyApp(ui, server)
# Example 2: HTML5 time input fallback (no extra package)
library(shiny)

ui <- fluidPage(
  tags$label("Pick a time (HTML5):"),
  tags$input(id = "time_html5", type = "time", value = "09:00"),
  # JS to register native HTML input with Shiny
  tags$script(HTML("
    $(document).on('change', '#time_html5', function() {
      Shiny.setInputValue('time_html5', this.value);
    });
  ")),
  verbatimTextOutput("html5_time")
)

server <- function(input, output, session) {
  output$html5_time <- renderPrint({
    val <- input$time_html5
    if (is.null(val) || val == "") "No time selected" else paste("HTML5 time:", val)
  })
}
shinyApp(ui, server)
3.5. File Handling and Actions
3.5.1 fileInput
- Supports multiple files and accepts param (mime types).
- Validate file type and size on server; reject invalid files early using validate().
- Use progress indicators for larger uploads.
Example with validation
ui <- fluidPage(
  fileInput("file", "Upload CSV", accept = c(".csv", "text/csv")),
  tableOutput("head")
)
server <- function(input, output, session) {
  output$head <- renderTable({
    req(input$file)
    ext <- tools::file_ext(input$file$name)
    validate(need(ext == "csv", "Please upload a CSV file"))
    df <- tryCatch(read.csv(input$file$datapath), error = function(e) NULL)
    head(df)
  })
}
shinyApp(ui, server)
3.5.2 actionButton / actionLink / downloadButton
- actionButton triggers events; use observeEvent() or eventReactive() for controlled behaviour.
- actionLink appears like text; useful for contextual interactions.
downloadButton
# Example A: actionButton triggering an event (simple demo)
library(shiny)

ui <- fluidPage(
  actionButton("run", "Run task"),
  verbatimTextOutput("status")
)

server <- function(input, output, session) {
  observeEvent(input$run, {
    showNotification("Task started...", type = "message")
    # simulate work (demo only; avoid long sleeps in real apps)
    Sys.sleep(1)
    output$status <- renderPrint({ paste("Last run at", Sys.time()) })
    showNotification("Task completed", type = "message")
  })
}

shinyApp(ui, server)
# Example B: actionLink used as a lightweight toggle / counter
library(shiny)

ui <- fluidPage(
  p("Click the link to reveal details: ", actionLink("more", "Show details")),
  uiOutput("details")
)

server <- function(input, output, session) {
  output$details <- renderUI({
    # input$more increments on each click
    if (input$more %% 2 == 1) {
      tagList(
        p("Here are the extra details."),
        p("Clicks:", input$more)
      )
    } else {
      NULL
    }
  })
}

shinyApp(ui, server)

# Example C: downloadButton paired with downloadHandler to export a CSV
library(shiny)

ui <- fluidPage(
  titlePanel("Sample Data Display & Download CSV"),
  tableOutput("sample_table"),
  downloadButton("download_data", "Download sample CSV")
)

server <- function(input, output, session) {
  sample_data <- reactive({
    data.frame(id = 1:5, value = letters[1:5], stringsAsFactors = FALSE)
  })

  # Display table
  output$sample_table <- renderTable({
    sample_data()
  })

  # Download handler
  output$download_data <- downloadHandler(
    filename = function() {
      paste0("sample-data-", Sys.Date(), ".csv")
    },
    content = function(file) {
      write.csv(sample_data(), file, row.names = FALSE)
    },
    contentType = "text/csv"
  )
}

shinyApp(ui, server)
3.6. Next-Generation Input Controls
selectizeInput
Advanced searching, tagging, and dynamic option creation. For large choices, enable server = TRUE to limit browser memory traffic.
# Example: server-side selectize (use choices = NULL + updateSelectizeInput(server = TRUE))
library(shiny)

ui <- fluidPage(
  selectizeInput("item", "Select item", choices = NULL, options = list(placeholder = "Type to search")),
  verbatimTextOutput("sel")
)

server <- function(input, output, session) {
  # simulate a large choices vector (demo); in real apps this might be thousands of items
  big_choices <- paste0("item-", sprintf("%04d", 1:2000))
  # populate selectize on server to avoid sending entire list to browser
  updateSelectizeInput(session, "item", choices = big_choices, server = TRUE)
  output$sel <- renderPrint({
    req(input$item)
    paste("You chose:", input$item)
  })
}

shinyApp(ui, server)
pickerInput (from shinyWidgets)
# Example: pickerInput with multiple select and actions box
# install.packages("shinyWidgets") if not installed
library(shiny)
library(shinyWidgets)

ui <- fluidPage(
  pickerInput("picks", "Choose features", choices = c("A","B","C","D","E"),
              multiple = TRUE, options = list(`actions-box` = TRUE, `live-search` = TRUE)),
  verbatimTextOutput("picked")
)

server <- function(input, output, session) {
  output$picked <- renderPrint({
    sel <- input$picks
    if (is.null(sel) || length(sel) == 0) "No selection" else paste("Selected:", paste(sel, collapse = ", "))
  })
}

shinyApp(ui, server)
colourInput (from colourpicker)
# Example: colourInput to let user pick a color for a plot
# install.packages("colourpicker") if not installed
library(shiny)
library(colourpicker)

ui <- fluidPage(
  colourInput("col", "Choose a color", value = "#2c7fb8"),
  sliderInput("n", "Points", min = 10, max = 200, value = 50),
  plotOutput("plt")
)

server <- function(input, output, session) {
  output$plt <- renderPlot({
    set.seed(123)
    x <- rnorm(input$n); y <- rnorm(input$n)
    plot(x, y, pch = 19, col = input$col, main = paste("Color:", input$col))
  })
}

shinyApp(ui, server)
3.7. Advanced Implementation Techniques
Dynamic input generation
- Use uiOutput/renderUI or insertUI/removeUI for runtime UI changes.
- Combine with observeEvent to respond to data loading or user decisions.
Input validation and error handling
- Use validate(), need(), req() to short-circuit renders and show friendly messages.
- Use tryCatch() around data operations for controlled error messages.
Conditional visibility & reactive UI updates
- Use conditionalPanel on client side and renderUI on server side for more complex logic.
Input state management & session persistence
- Use saveRDS() or cookies (via shinyjs) to persist user preferences.
- Consider bookmarking (shiny::bookmarkState) for reproducible app states.
Custom inputs and JS integration
- Create htmlwidgets or use shiny::tags and JavaScript for custom controls.
- Use Shiny.setInputValue from JS to push values to server.
Performance optimization
- Reduce reactive recomputation using isolate(), eventReactive(), and memoization (memoise).
- Use data.table or arrow for large datasets.
- For selectize server = TRUE with ajax-like behavior when choices > ~2000.
Accessibility and inclusive design
- Provide labels for screen readers.
- Ensure color contrast and keyboard navigability.
- Test with NVDA or VoiceOver.
Mobile responsiveness
- Use Bootstrap grid; prefer touch-friendly controls (bigger targets).
- Avoid long drop-downs on mobile; use modal selection lists.
3.8. Real-World Application Patterns
Dashboard creation
- Coordinated inputs often drive multiple plots; use modules for neatness.
Form wizards
- Multi-step forms using shinyjs::show/hide or conditionalPanel.
Data exploration & filtering
- Chain filters with reactiveValues and reactives for efficient pipelines.
Interactive reporting
- Parameterized reports using rmarkdown::render with inputs and downloadHandler.
E-commerce and booking
- Combine dateRangeInput, numericInput (quantity), selectizeInput (product), and fileInput for invoice uploads.
3.9. Best Practices and Professional Tips
Naming conventions
- Use descriptive inputId names: input$filter_start_date, input$price_max.
- Prefix module IDs to avoid collisions.
UX design
- Keep forms short, show inline help and hint text.
- Use progressive disclosure: show advanced options only when needed.
Security
- Sanitize inputs used in SQL or system calls.
- Limit file upload types and sizes.
- Avoid exposing internal data structures to the client.
3.10. Troubleshooting and Common Pitfalls
Reactive dependency management
- Debug with reactiveLog and shiny::reactlog_enable(); call reactiveLog() during dev.
Input sanitization and validation
- Always check content before processing.
Cross-browser compatibility
- Test on Chrome, Firefox, Safari and mobile browsers.
Memory management
- Remove large reactive values when not needed using rm() and gc().
3.11. Future-Proofing Your Applications
Trends
- Moving parts of UI to modern JS frameworks (Vue, React) while keeping server in R.
- WASM and faster in-browser data processing.
- Enhanced widgets and accessibility improvements.